
The Cream and Blue Crossroads-embroidery project
The Cream and Blue Crossroads-embroidery project
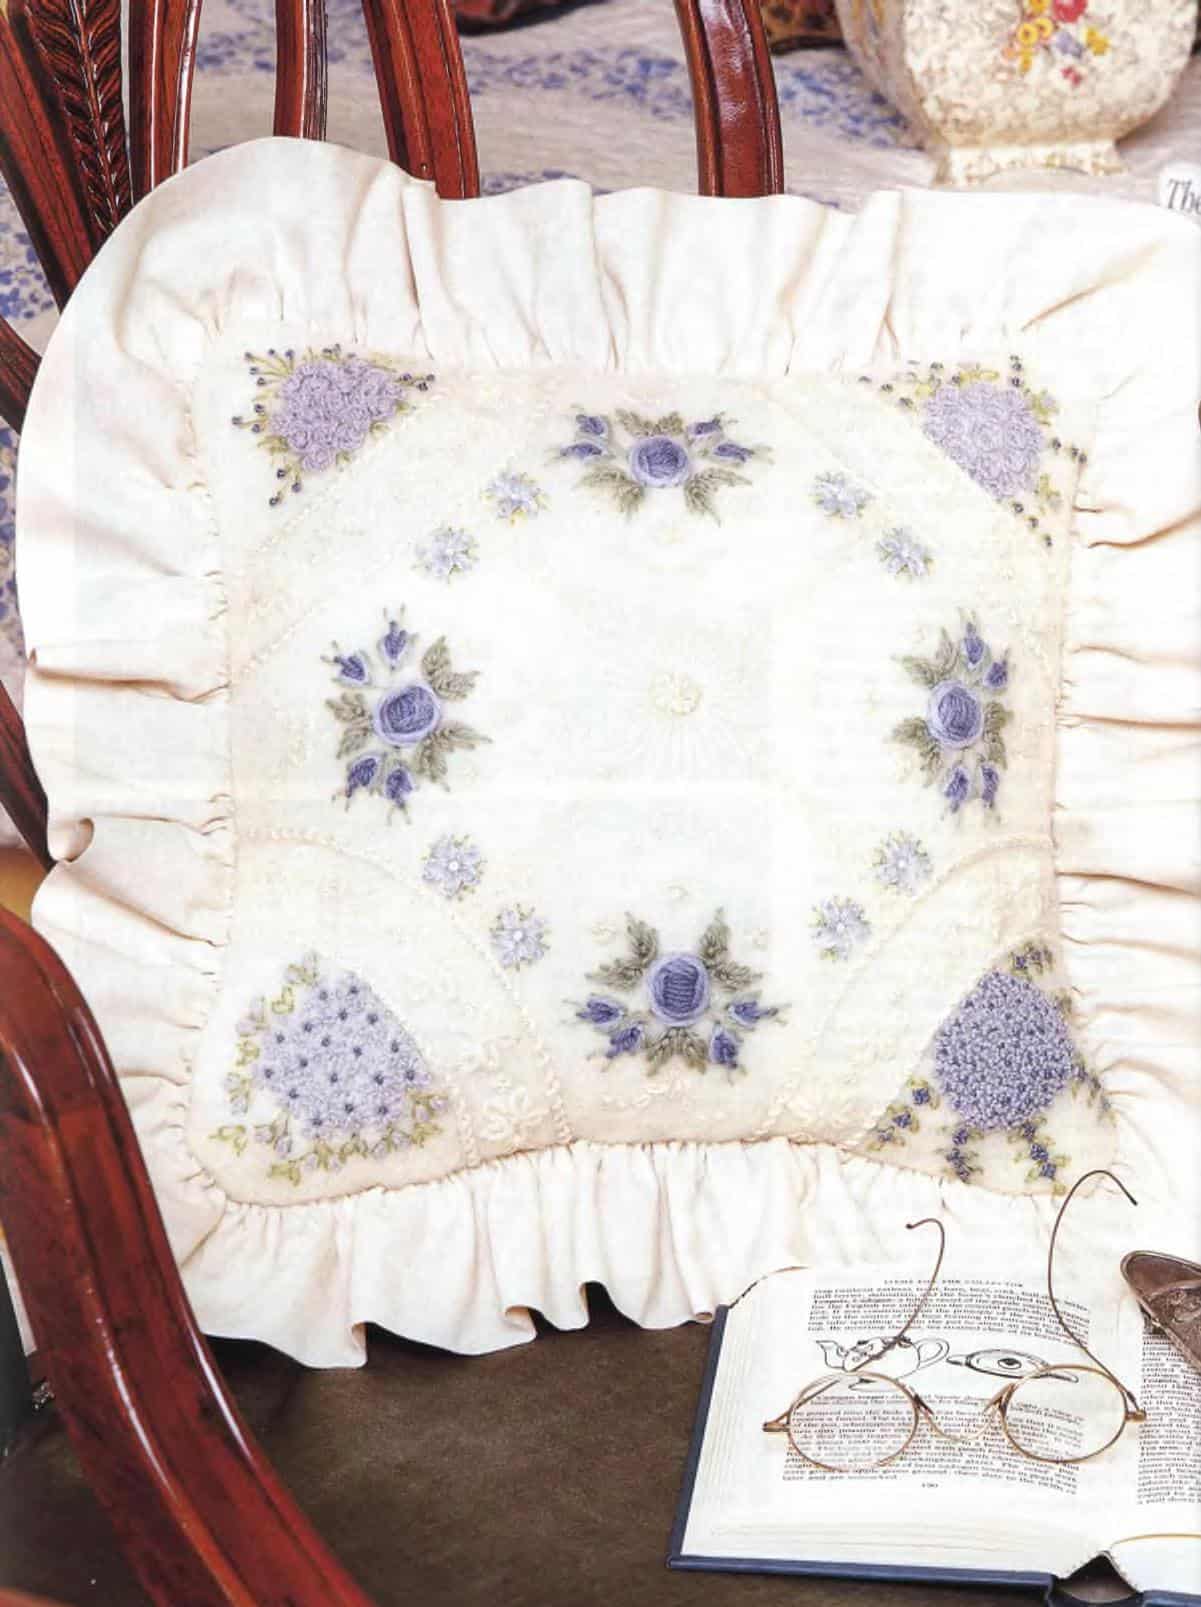
A decorator’s delight’ – describes this beautiful blue and cream wool-embroidered cushion designed and stitched by Joan Watters.
MATERIALS
33cm (½ in) square piece of wool blanketing • 20cm (8in) square piece of cotton voile
• Anchor tapestry wool: one skein each of cream (8006), light blue (8712), medium blue (8734), dark blue (8736) and green (9074)
• Anchor No 3 Perle cotton: one skein of cream (926)
• Anchor No 5 Perle cotton: one skein of cream (926)
• Anchor Stranded Cotton: one skein each of cream (275) and dark blue (977)
• Paterna wool: one skein of pale blue (D392)
• Kacoonda mohair wool: one skein of No 8J
• Mogear mohair wool: one skein of blue No 29
• 2.75m (3yds) lace
• 32 small cream beads
• Mill Hill glass seed beads: one packet of cream (00123)
• No 18 and No 22 chenille needles
• No 9 and No 10 crewel needles
• 1 spring hoop 12.5cm (Sin) in diameter
• 2B pencil
• Water-soluble marking pen
DESIGN SIZE
30cm (12in) square
STITCHES USED
Buttonhole stitch, chain stitch, colonial stitch, feather stitch, fly stitch, lazy daisy stitch, satin stitch, stab stitch, stem stitch, straight stitch, whipped chain stitch
PREPARATION
To transfer the design to the fabric, take a piece of tracing paper the same size as the pattern on the pattern sheet and using a 2B pencil, mark the centre of each flower with a pencil dot or mark the entire flower if you think it is easier for you when doing the embroidery.

With a needle, poke a hole through the tracing paper where you have marked the dots and then place it onto the piece of wool blanketing. If you have a large design it is a good idea to tack the tracing paper onto the fabric, but with a smaller design you can use pins to hold the design in place. Using the water-soluble marking pen and pressing firmly, transfer the markings through the holes in the tracing paper onto the wool blanketing. You will end up with a series of dots that represent your flowers. Transfer each section in this manner, marking only a small section at a time.
Hint: To remove the water-soluble marking pen, wet the fabric well, once you have completed your embroidery.
EMBROIDERY
Note: The No 18 chenille needle is used for all of the wool embroidery, whether the wool is thick or thin. The No 22 chenille needle is used for all the stranded cotton embroidery.
The No 9 crewel needle is used for sewing the pearl beads onto the centre of the large daisy and the No 10 crewel needle is used to sew the small cream seed beads onto the fabric. STEP 1: Transfer the corner half circles as described above. Stitch the corner sections using a whipped chain stitch with the No 3 Perle cream (926). Stitch all the corners and the inner half circles in this manner. STEP 2: Place the voile into the hoop to stitch the centre of the large daisy. Draw a circle with your water- soluble marking pen the same size as the circle in diagram 1.
Fill the circle with colonial knots using six strands of cream (275). The circle must be packed full of the colonial knots. Then stitch a few cream (00123) beads amongst the colonial knots. Draw a small seam allowance line around the outside of the centre of the knots and cut the circle out around this line. Refer to diagram 2.
Position the centre of the daisy onto your fabric, then using the No 9 crewel needle threaded with two strands of cream (275), fold the seam allowance towards the centre of the knots on the wrong side of the fabric. Stab-stitch around the circle of knots making sure the stab stitches are very close together. Stitch large lazy daisy stitches using the cream (8006), extending the holding stitch.
An easy way to keep your petals all the same length is to draw a circle the size of the outside of the daisy before you start to stitch the petals.
This will make all your petals the same length. Refer to diagram 3. STEP 3: Transfer the feather stitch lines onto your fabric and stitch them using the No 5 Perle cream (926). Start the feather stitch from the outside edge working towards the centre of the design. Stitch three seed beads in cream (00123) onto the end of each of the spokes of the feather stitches, using two strands of cream (275). Stitch two lazy daisy stitches at the edge of the daisy petals using No 5 Perle cream (926). Refer to the pattern sheet for the placement. Transfer the small blue daisies on either side of the row of feather stitch, in front of the halfcircle row of stitching. These are stitched with five lazy daisy stitches using a double thread of blue (29). Then using one strand of the 8J, stitch small fly stitches for the leaves. The centre is then stitched with a colonial knot using six strands of cream (275). Refer to the pattern sheet.
STEP 4: Transfer the positions for the wool roses onto the wool blanketing.
Row 1: Using dark blue (8736), work five satin stitches, 4mm (‘Ain) in length, close together. Refer to diagram 4A. Work seven satin stitches close together over the top of the first five. The stitch length this time is 12mm (‘Ain). Extend the length of the stitch on one side only. Refer to diagram 4B.
Row 2: Using the medium blue (8734), bring the needle up at A in the corner. Refer to diagram 4C.
Take it down at the opposite corner at B and then bring it back up at A all in one movement. Take the needle back down just above B, and then up again at A all in one movement, creating a slight angle on the stitch, pushing the needle from one point to the other. Refer to diagram 4D.
Work the next stitch a little below the last stitch, but this time go straight down at B. Refer to diagram 4E.
Bring the needle up at B in the corner and begin the next set of three stitches. Refer to diagram 4F.
Working in a clockwise direction, repeat the previous instructions three more times so that you cover the four corners of the rose. Refer to diagram 4G.
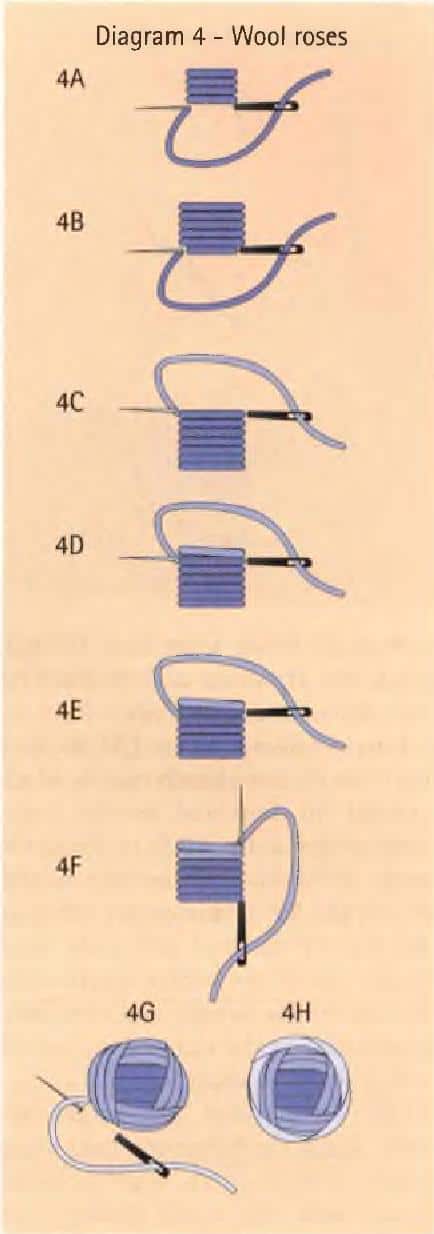
Row 3: This final step is very important, as it makes a square rose into a round rose. Using light blue (8712), make a large stem stitch, but instead of keeping the wool in a back position, keep it on the top of the rose. This method gives the rose a fluffy look. Work this row in an anticlockwise direction. Refer to diagram 4H.
The size of the stitches are 12mm (‘Ain) in length, but you do not have to measure the size of every stitch. Take an even amount with the needle, 4mm (V«in), front and back to the previous stitch. This means you are moving around the same amount of space for each stitch. When you return to the point where you started, you must go two stitches past the start to make the rose look even. STEP 5: Transfer the leaves onto the wool blanket fabric.
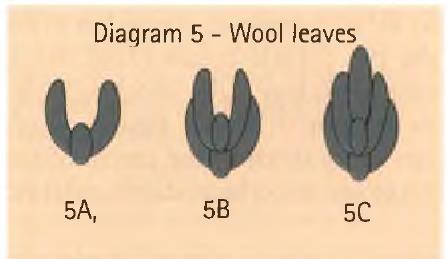
Row 1: Using the green (9074), stitch one fly stitch with a small gap in between the spokes. Refer to diagram 5A.
Row 2: Stitch a fly stitch above the first one, making the gap between the spokes smaller again. Refer to diagram 5B.
Row 3: Stitch a straight stitch in the gap of the previous fly stitch. Refer to diagram 5C.
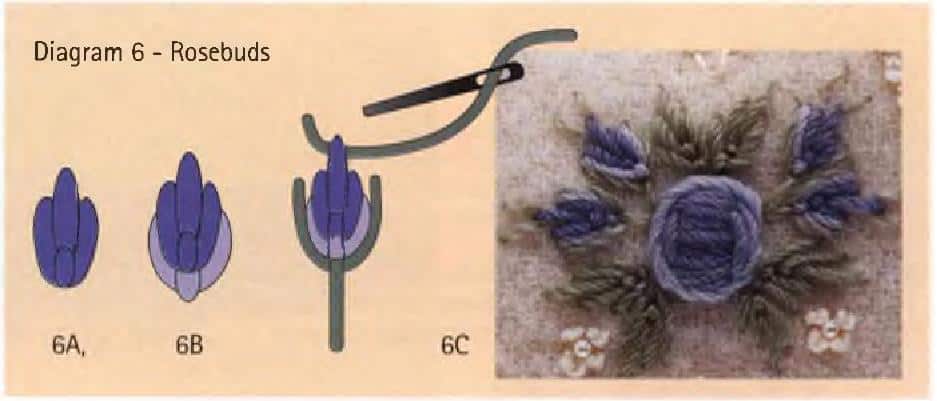
STEP 6: Transfer the wool rosebuds to the wool blanket fabric.
Row 1: Using dark blue (8736), stitch one fly stitch and one straight stitch. Do not make the space between the spokes of the fly stitch too large, as the straight stitch must fit snugly inside the fly stitch. Refer to diagram 6A.
Row 2: Using light blue (8712), work one fly stitch around the first row. Refer to diagram 6B.
Row 3: Using green (9074) split into two threads, stitch one fly stitch around the first and second rows, extending the fly stitch to form the stem of the bud. Bring your needle out to the left of the centre stitch at the top of the bud and slide your needle under the centre stitch using the eye of the needle and then into your fabric at the right of the centre stitch. Refer to diagram 6C.
STEP 7: Transfer the forget-me- nots. Stitch the forget-me-nots using cream (8006) with four colonial knots with one small cream pearl bead sewn in the centre.
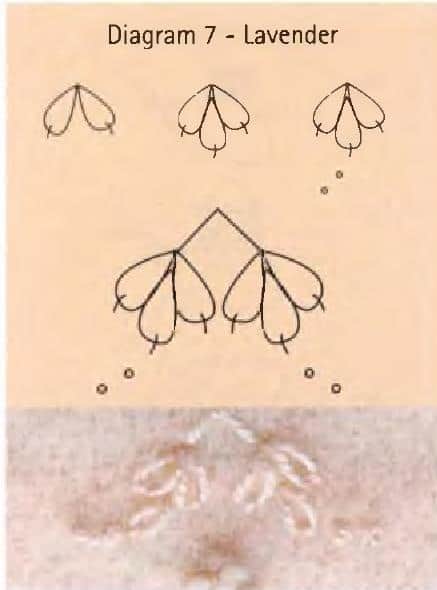
STEP 8: Transfer the lavender. Using the No 5 Perle cream (926), stitch two small lazy daisy stitches. Refer to diagram 7. Stitch another small lazy daisy stitch in the centre of the previous two lazy daisy stitches.
Embroider two colonial knots below the last lazy daisy stitch. Stitch one fly stitch from one lavender bunch to the other, using the same thread. Refer to diagram 7.
STEP 9: Transfer the cream daisies in the half circle in the corner sections. Using cream (8006), stitch five evenly-placed lazy daisy stitches for the petals for the daisy. Tip each daisy with a small straight stitch over the end of each petal using the No 5 Perle cream (926). Stitch two lazy daisy stitch leaves at the end of the daisies and one forget-me-not in between each cream wool daisy using the same thread. Each forget- me-not is made up of four colonial knots and one small cream seed bead for the centre.
STEP 10: Transfer the small halfcircle pattern to the four corners of the fabric.
CORNER 1: Fill the small half circle with small lazy daisy flowers with five petals, using one strand of pale blue (D392). Embroider the daisy buds with one lazy daisy stitch using the same thread. For the leaves, stitch a lazy daisy stitch with the holding stitch extended, using one strand of No 8J. The greenery around the buds is stitched using the same thread with one fly stitch and extending the holding stitch to form the stem of the bud.
CORNER 2: This half circle is filled with groups of four colonial knots forming a forget-me-not using one strand of pale blue (D392). The centre is worked with one colonial knot using three strands of dark blue (977).
Hint: It is a good idea to embroider three forget-me-knots in a group, then stitch the centres.
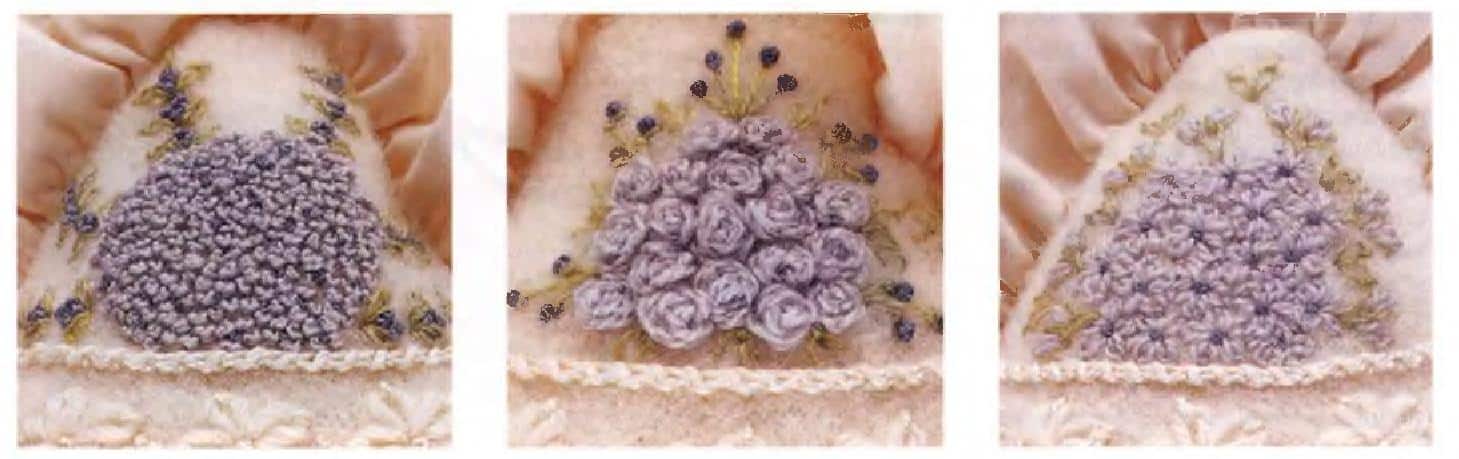
For the outside flowers, embroider groups of four colonial knots using six strands of dark blue (977). These flowers do not have any centres. The leaves around these flowers are small lazy daisy stitches on either side of each of the groups of four colonial knots. The last group has one leaf at the end. These are worked with mohair No 8J. CORNER 3: These sections are worked with small buttonhole stitched flowers using one strand of pale blue (D392). The buds are stitched with three buttonhole stitches in a fan shape using the same thread.
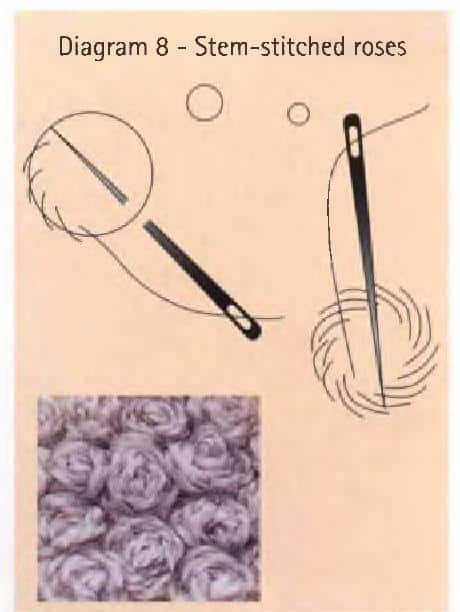
The vine flowers are made up of one colonial knot using six strands of dark blue (977). The greenery around the vines is stitched with a small fly stitch extending the holding stitch slightly, using one strand of mohair (8J). With the same thread, stitch one lazy daisy stitch either side of the stem for the bud. CORNER 4: The stem-stitched rose is stitched using one strand of pale blue (D392) in this corner. It is important to keep these roses very small. Draw a very small circle with your water-soluble pen for the centre of the rose. Work stem stitches in a circle in an anticlockwise direction towards the centre, keeping the stitches very loose. To finish the flower, take the thread down through the back leaving a loose loop on the top. When finishing off the thread, make
sure not to pull the loop too tight. Refer to diagram 8. For the buds, using six strands of (977), stitch a colonial knot for each one following the pattern on the pattern sheet. The greenery is stitched with one small fly stitch around the centre bud and extending the holding stitch back to the stem stitch roses to form the stem of the bud. The remaining stems are a straight stitch with a fly stitch forming at the base of them. All the greenery is stitched with one strand of green (8J) starting with a knot and then a backstitch to secure the knot.
FINISHING
To make up the back for the cushion, cut two rectangles of fabric 35cm x 20cm (Min x 8in) and join them together with the zipper. Open the zipper 10cm (4in).
For the frill, cut two and a half strips across the width of the fabric 15cm (6in) wide. Join them to form a circle and fold the seam allowance to one side. Fold the frill in half, wrong sides together and press with an iron. Cut the lace to measure the same length as the frill and then stitch the raw edges, right sides together. Place the top edge of the lace onto the raw edge of the frill and join both together with two rows of gathering stitches, 6mm (V4in) apart starting the first row 6mm (‘Ain) down from the raw edges.
Divide the frill into quarters and place a pin or a coloured thread at these points. Pull the gathering threads until the frill fits the cushion, slightly rounding it at the corners. Adjust the gathers evenly between the quarter-way marks. Place the frill with the top edge to the raw edge of the cushion top, and pin it in place, slightly rounding the frill in the corners, then stitch it in place.
Place the back for the cushion, right side to the right side of the cushion top and pin it in place. Stitch all layers
together following the stitching line of the frill. Trim the edges and zigzag or overlock to neaten them. Turn the cushion right side out and place the cushion insert inside.