
Buzzing in the meadow-embroidery project

Buzzing in the meadow-embroidery project
Indulge a little you- time to master essential embroidery stitches and recreate this sweet bummblebee scene.
Designer Georgie K. Emery
MATERIALS:
- Fabric 35x35cm
- Stranded cotton: see Notes
- Water-erasable marker pen
- Embroidery hoop: 18cm diameter
- Basic embroidery kit
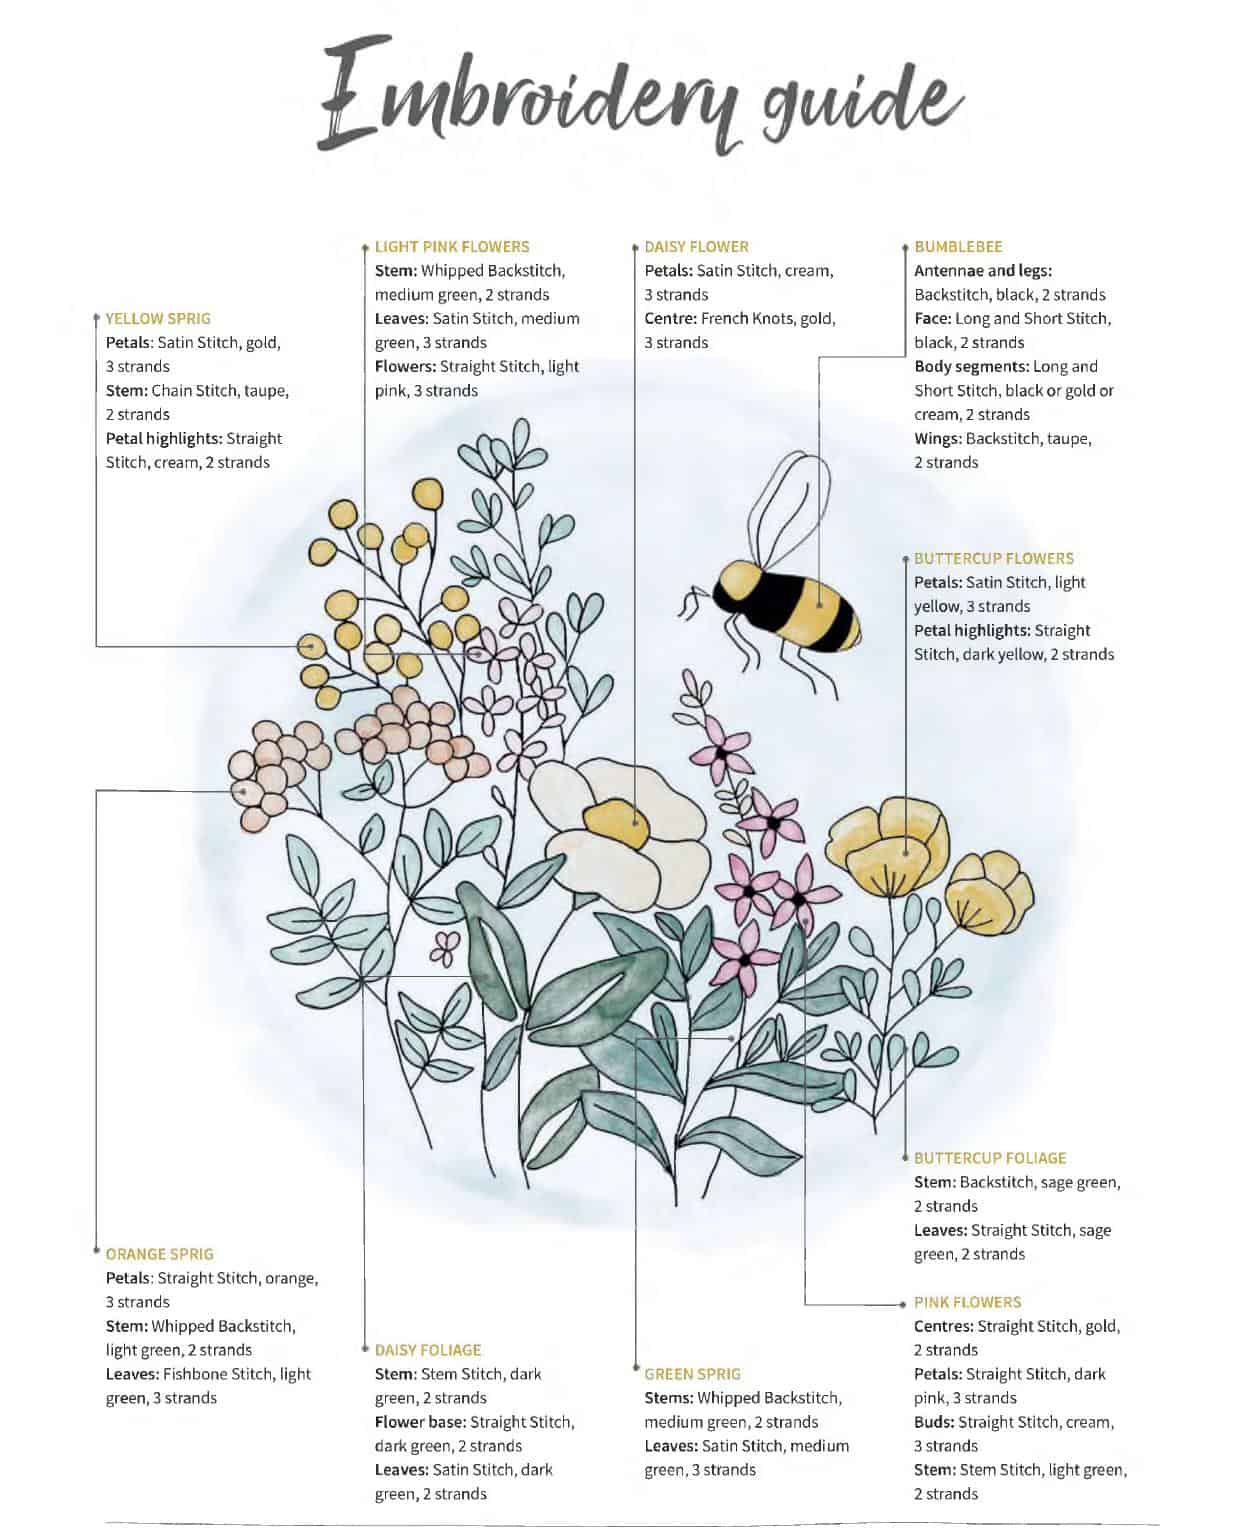
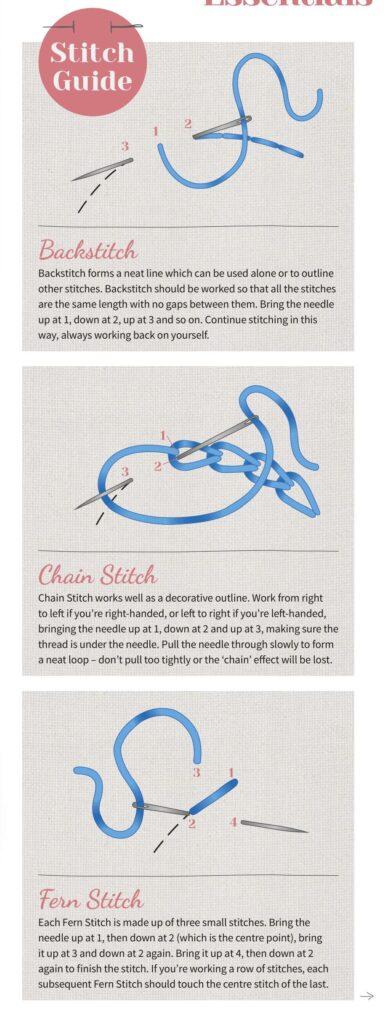
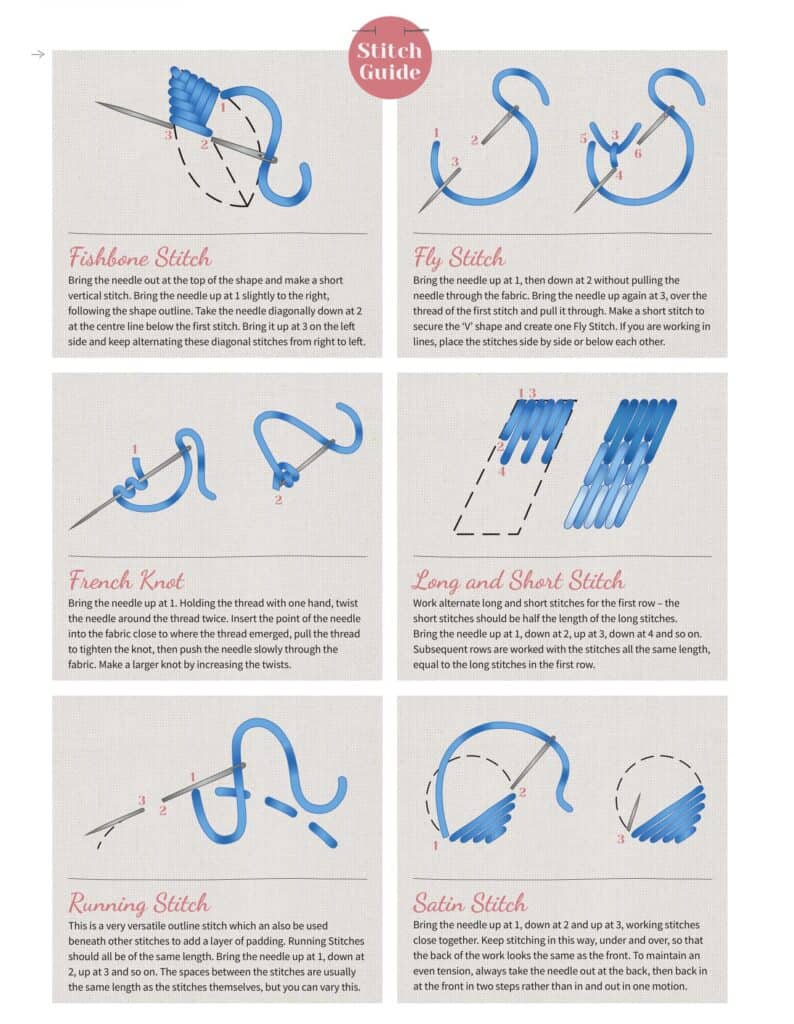
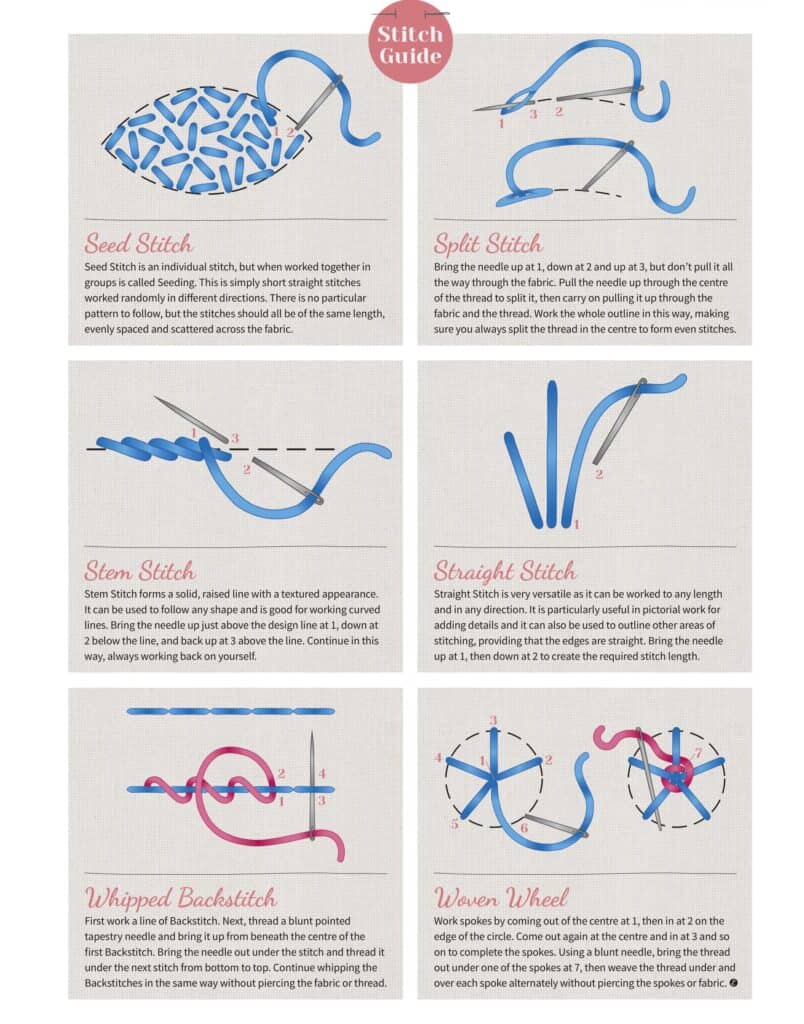
STITCHES USED: Backstitch, Chain Stitch, Fishbone Stitch, French Knot, Long and Short Stitch, Satin Stitch, Stem Stitch, Straight Stitch, Whipped Backstitch
NOTES
DMC stranded cotton, 1 skein of each: 19 (dark yellow), 151 (light pink), 310 (black), 452 (taupe), 728
(gold), 894 (dark pink), 991 (dark green), 3078 (light yellow), 3341 (orange), 3812 (medium green),
3815 (sage green), 3823 (cream), 3851 (light green)
You know spring is finally here when you get your first glimpse of a buzzing bee, dancing among the flowers. Georgie K. Emery’s whimsical scene encapsulates this magical moment in nine different stitches, which you can learn how to master using our illustrated Stitch Guide The painterly effect is achieved by mixing stitch direction and blending colours.
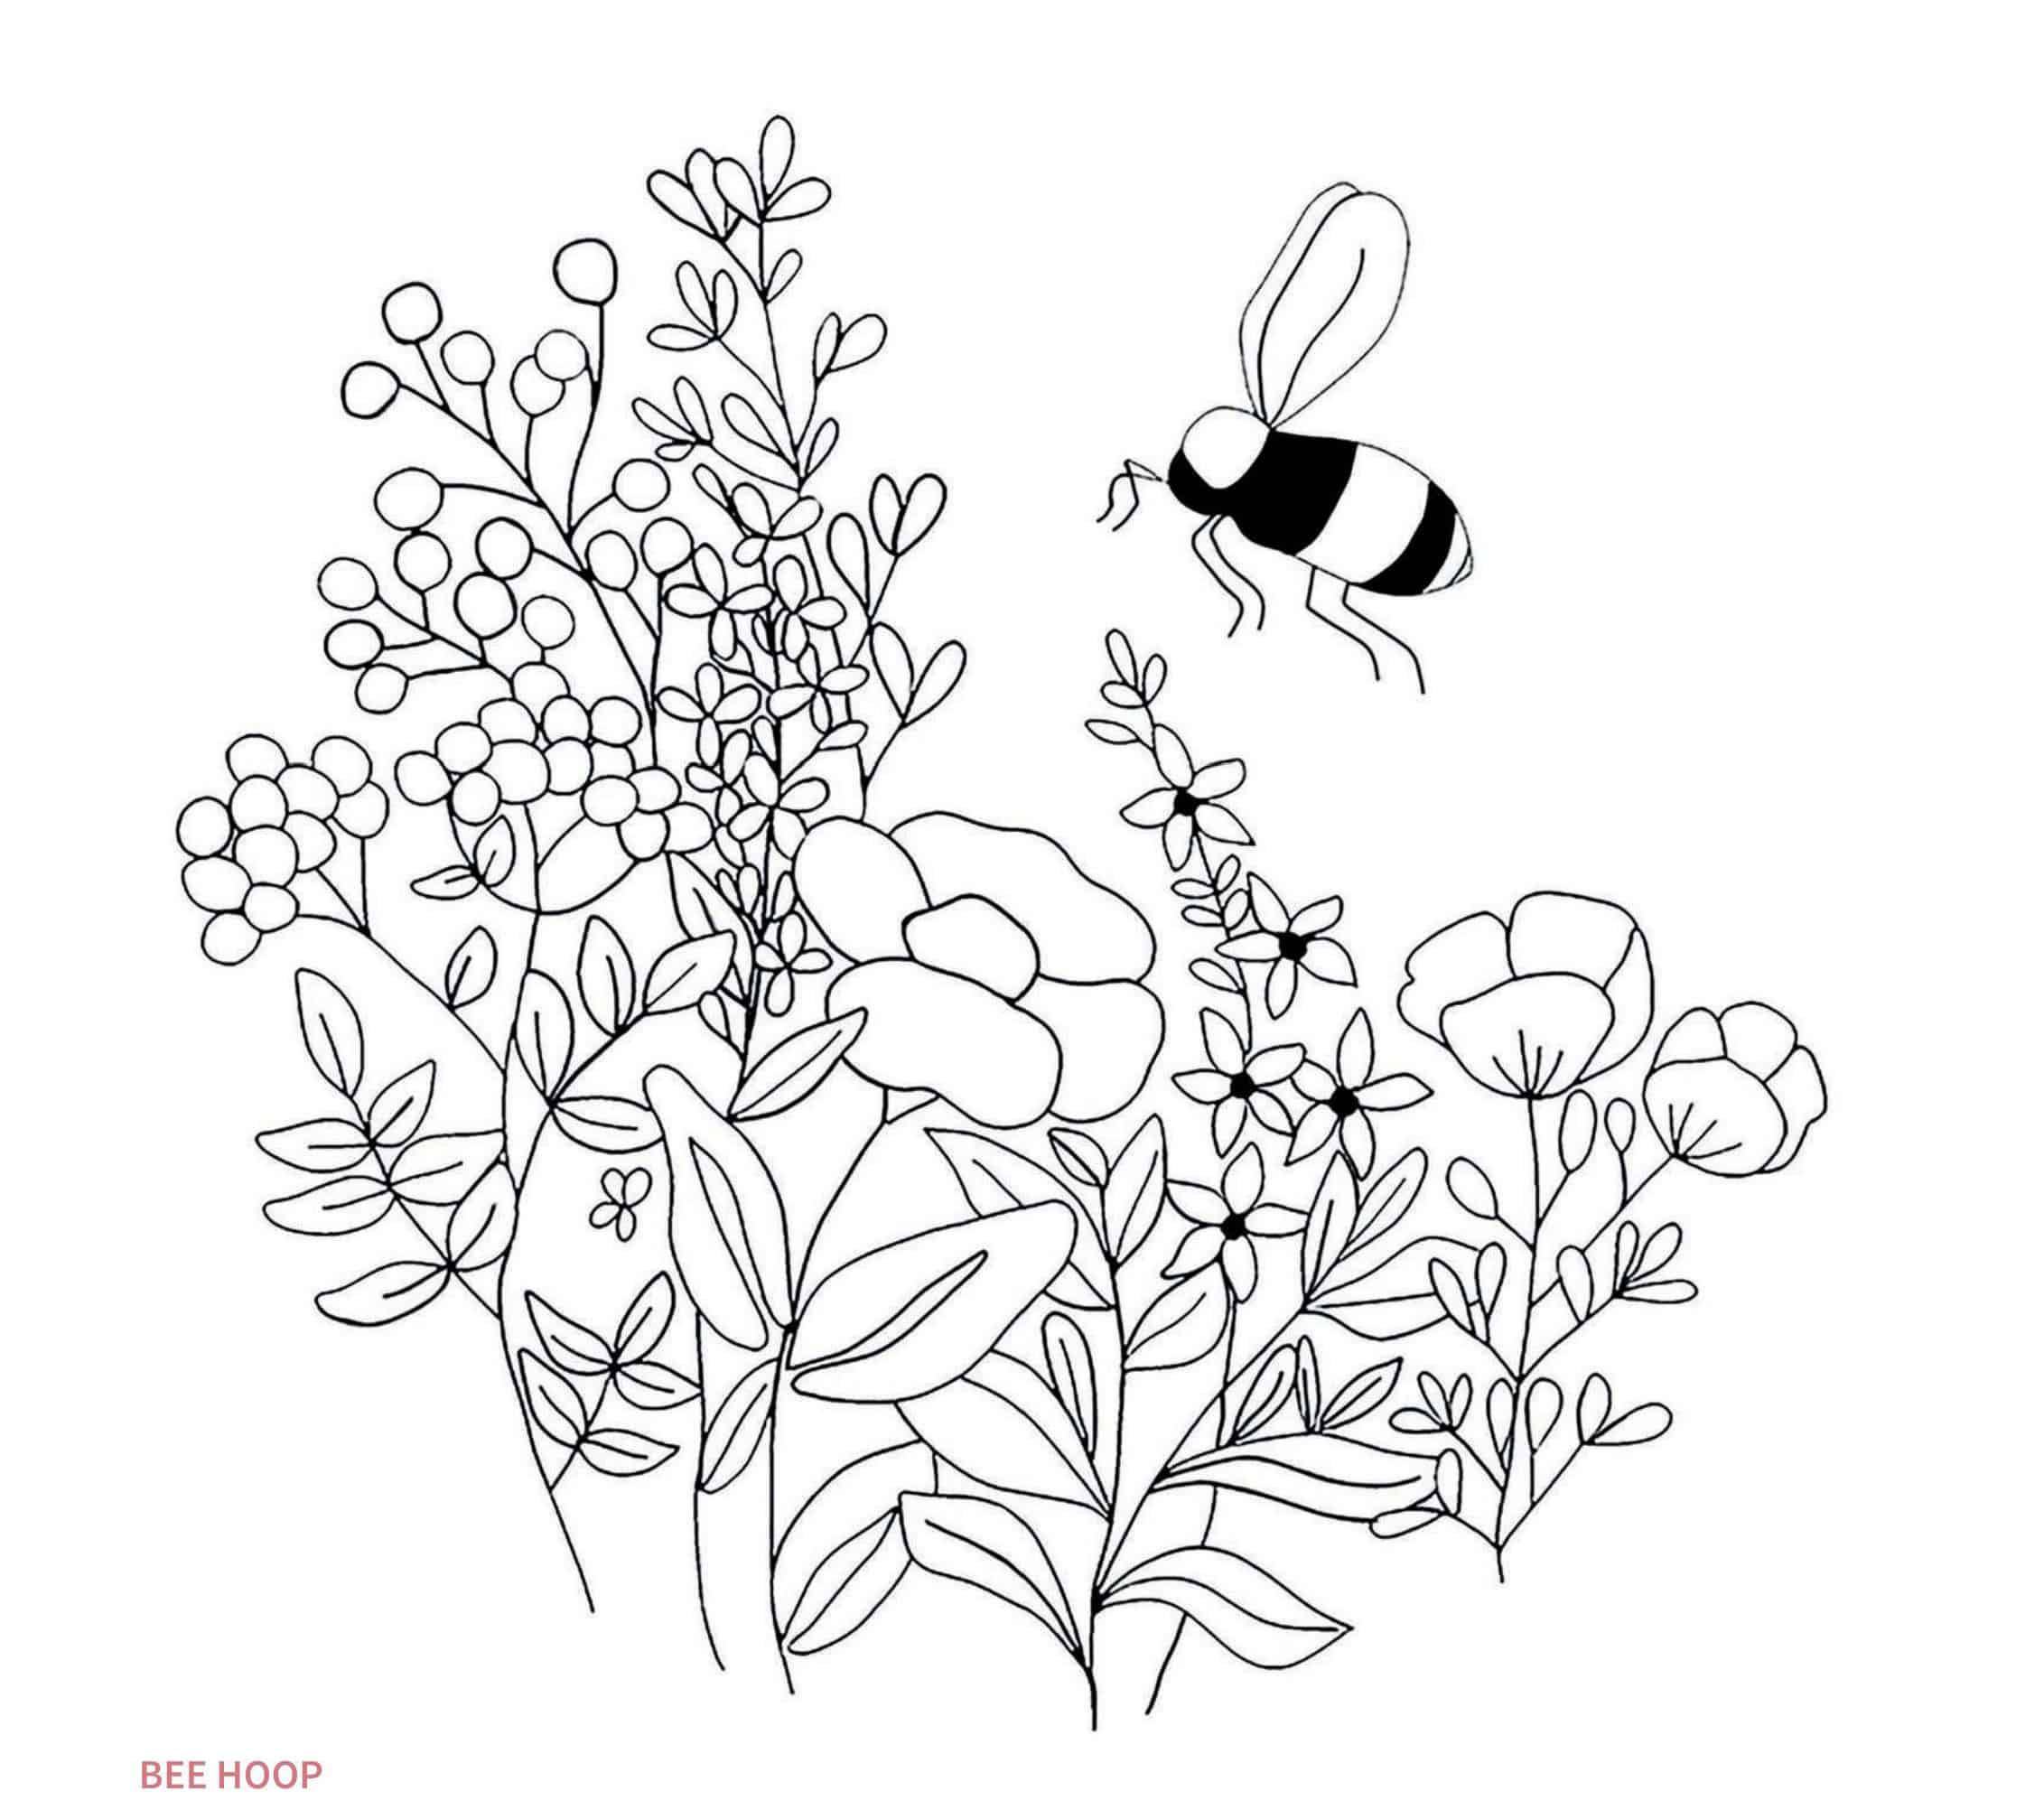
1. Before you begin, make sure your fabric is stretched tightly in the hoop. It should be like the surface of a drum. Keeping it tight will not only ensure your design transfers correctly and without distortion, but it will
also help you keep your stitches neat and prevent any warping of the fabric. Transfer the design from the template using your preferred method.
2.BUTTERCUP FLOWERS
Work the petals in Satin Stitch using three strands of light yellow. Start in the centre and stitch outwards, filling the petal with neat stitches worked close together. Once the petals have been filled, work Straight Stitches on top using two strands of dark yellow. Start your stitching at the bottom of each petal and stitch towards the middle, blending in to the stitches beneath.
3. BUTTERCUP FOLIAGE
Work the stem in Backstitch using two strands of sage green. Work the leaves in Straight Stitch using two strands of sage green. Start each leaf with a Straight Stitch in the centre of the shape and stitch outwards
filling in the shape. Stitch the sprig of leaves in the top left of the design in the same way using Straight Stitch.
4. ORANGE SPRIG
Work the petals in Straight Stitch using three strands of orange. Begin your stitches in the centre of the shape and work outwards with stitches close together to fill the circle.
5. Stitch the stem first in Whipped
Backstitch using two strands of light green. Stitch the leaves in Fishbone Stitch using three strands of light green.
6. PINK FLOWERS
Fill in the centre of each flower with small Straight Stitches using two strands of gold. Fill in the petal shapes with Straight Stitch using three strands of dark pink.
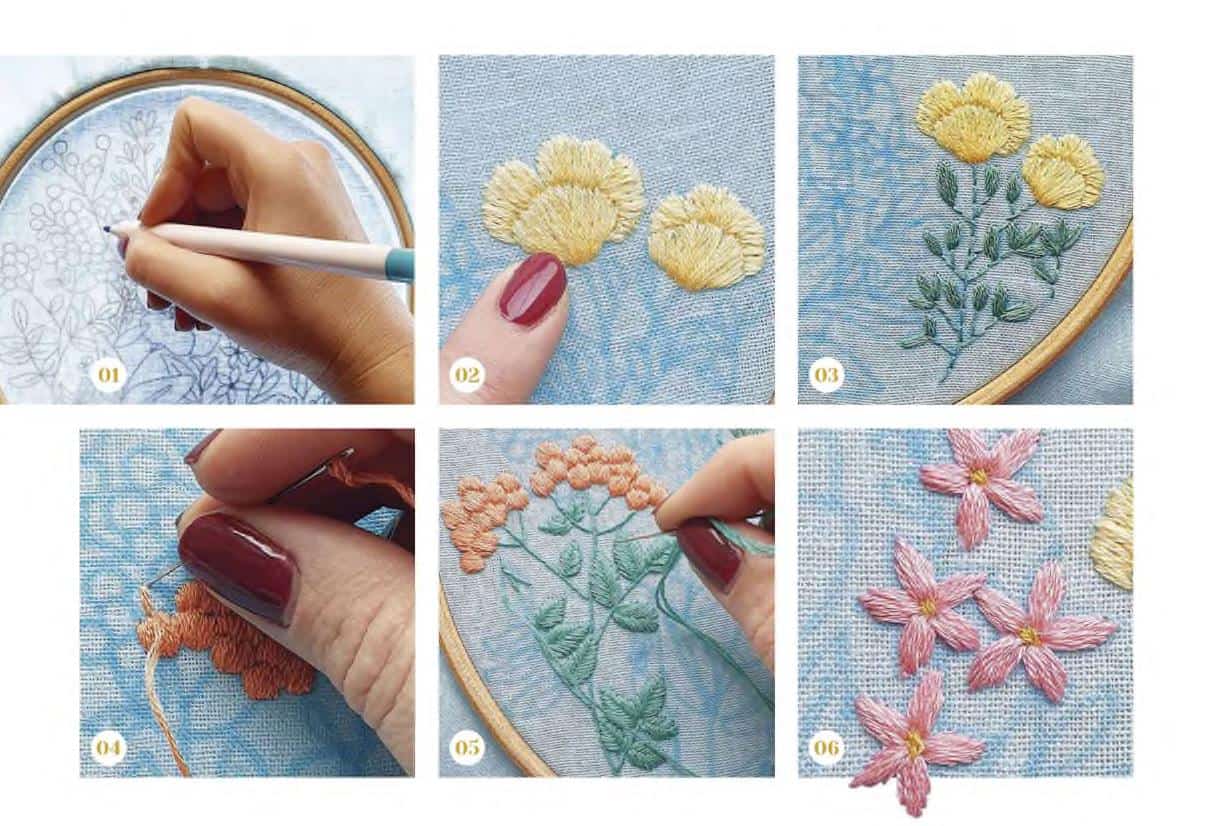
7. Fill in the flower buds with Straight Stitches using three strands of cream.
Work the stem in Stem Stitch using two strands of light green.
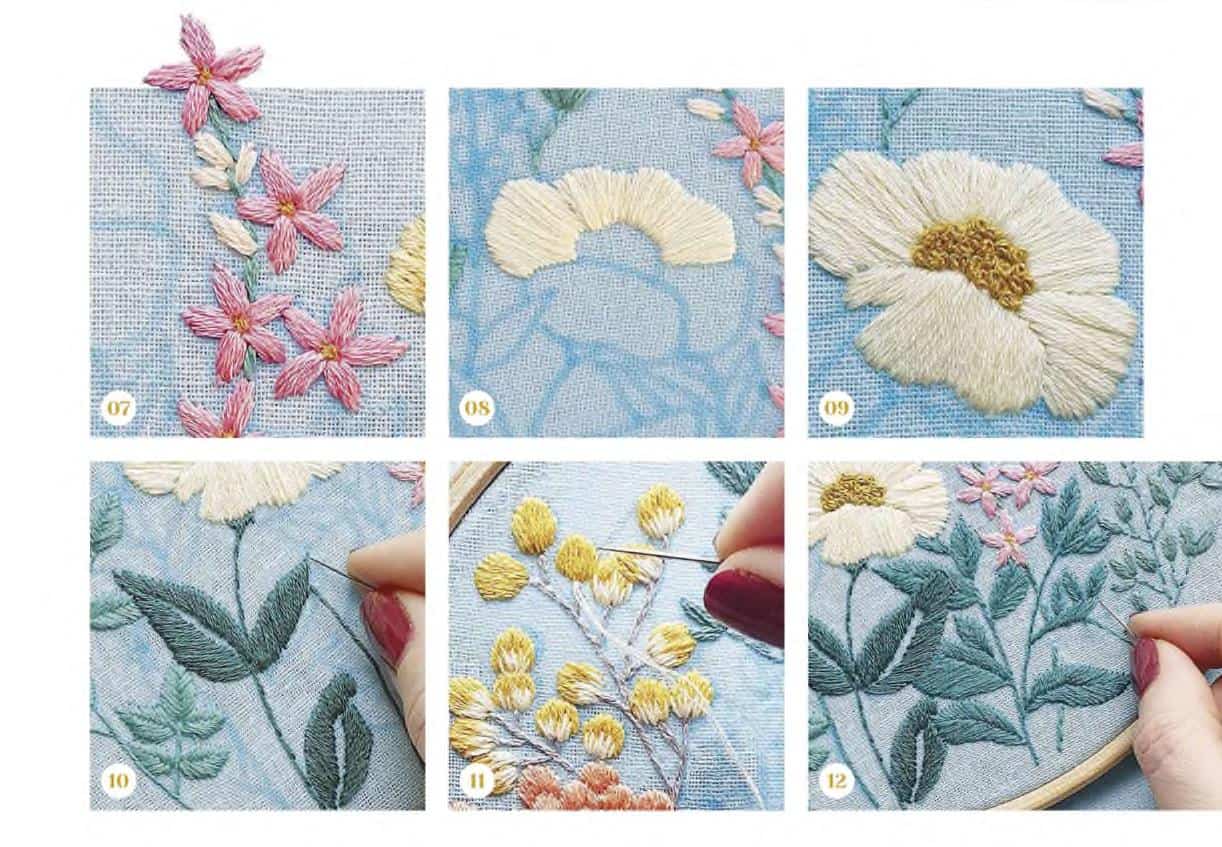
8. DAISY FLOWER
Fill in the petal shapes with Satin Stitch using three strands of cream. Curve the direction of your stitches around, following the shape of the petal.
9. Fill in the centre of the daisy with French Knots using three strands of gold.
10. DAISY FOLIAGE
Use two strands of dark green for all the leaves and stem. Work the stem in Stem Stitch. Work the top part of the stem and the base of the flower using Straight Stitch. Stitch the leaves in Satin Stitch, placing your stitches
diagonally and stitching up one side of the leaf first, then the other.
11. These delicate little flowers and stems are worked in three parts. Start by filling in the petals with Satin Stitch using three strands of gold. Then, stitch the stem in Chain Stitch using two strands of taupe. Finally, add
four to five Straight Stitches to the bottom sections of the circle-shaped petals using two strands of cream.
12. GREEN SPRIG
Stitch the stems first in Whipped Backstitch using two strands of medium green. Fill the leaves with Satin Stitch using three strands of medium green. Stitch one side of the leaf first with diagonal stitches and then use the same process to work down the other side of the leaf.
13. LIGHT PINK FLOWERS
Work the stem in Whipped Backstitch using two strands of medium green. Fill the leaves with Satin Stitch using three strands of medium green, following the same instructions as for the leaves in Step 12. Stitch the pink flowers in Straight Stitch using three strands of light pink.
14. BUMBLEBEE
Stitch the antennae and legs in small Backstitches using two strands of black. Fill in the face and two segments of the body in Long and Short Stitch, again using two strands of black. –
TIPS & TRICKS
1.When stitching large areas of Satin Stitch, it is easier to start in the middle of the shape and fill out the stitches on either side. This helps to set the angle and direction of your stitches.
2. When stitching the Long and Short Stitch on the bumblebee, it may be easier if you draw on some markings to assist you in placing your stitches to help you keep them in the right direction.
15. Fill in the head and middle section of the body using two strands of gold in Long and Short Stitch, curving them around and down towards the bottom of the body. Fill in the final segment of the bumblebee in Long and Short Stitch using two strands of cream. Work a row of Long and Short Stitch where the black stitches meet the cream stitches using two strands of gold. On the head and middle body section, work rows of Long and Short Stitch where the black stitches meet the gold stitches using two strands of cream.
16. Fill in the final segment of the bumblebee in Long and Short Stitch using two strands of cream. Work a row of Long and Short Stitch where the black stitches meet the cream stitches using two strands of gold.
On the head and middle body section, work rows of Long and Short Stitch where the black stitches meet the gold stitches using two strands of cream.
17. Work the wings in Backstitch using two strands of taupe.
18. FINISHING OFF
Once all the stitching is complete, gently wash away the soluble pen marks under water. When the fabric is dry, mount it back into the hoop, making sure your stitched design is positioned correctly, and that the fabric is
tight Trim away the excess fabric, leaving a couple of centimetres all the way round. Use liquid glue or a glue gun on the top edge of the inside hoop, pegging the fabric down as you go. Once the glue is dry, you can
remove the pegs.


