
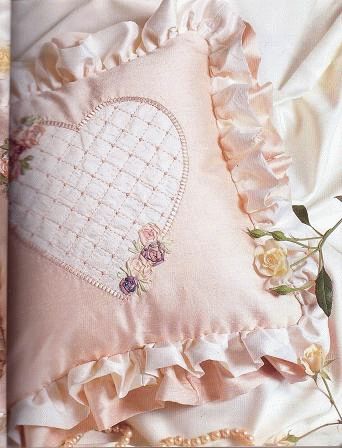
Embroidery project : Hearts & Flowers for machine ribbon embroidery
Like so many modern embellishment methods, the inspiration for machine ribbon embroidery has its origins in the classic techniques of handwork.
In this project, by Husqvarna’s Lorraine Jenkins, you’ll learn how to create beautiful silk-ribbon roses and leaves on an exquisite cushion using even the most basic of sewing machines.
In this project, by Husqvarna’s Lorraine Jenkins, you’ll learn how to create beautiful silk-ribbon roses and leaves on an exquisite cushion using even the most basic of sewing machines.
See more:
[sociallocker] MATERIALS• 1 m x 115cm (15/»yd x 45in) silk dupion
• 60cm x 115cm (5/»yd x 45in) silk dupion for centre contrast (heart)
• Machine embroidery thread, colour to tone with the main fabric
• Silk ribbons 4mm and 7mm widths:
For each rose allow 40cm (I6in) – large roses are made from 7mm (7<in) ribbon, small roses from 4mm
Allow 15cm (6in) of 4mm silk ribbon for each leaf cluster.
• One reel of monofilament thread
• One reel of Bobbinfil, white
• Machine needle, universal 80/12
• 1 m x 45cm fusible interfacing
• 25cm (lOin) square of Vliesofix (paper-backed fusible web)
• One 30cm (12in) zipper
• Non-permanent fabric marker
• Overlocker tweezers or a bamboo satay stick
• Embroidery scissors
• 12cm spring embroidery hoop
• Machine feet: braiding, candlewicking and ruffler or gathering
• Machine quilting guide
• 35cm cushion insert

METHOD
1. Cut two 38cm (ISin) squares from the main fabric for ihc front and back of the cushion. Cut one 25cm (lOin) square of contrast fabric for the heart applique.
2. Fuse the interfacing to the wrong side of the three fabric pieces to add support and body.
3. Fuse the square of Vliesofix to the back of the contrast fabric. Trace the heart pattern from the pattern sheet onto the paper side of the Vliesofix and cut out the heart shape. Remove the paper backing and fuse the heart shape in position on the centre front of the cushion.
4. Mark a diagonal line across the heart with the fabric marker. Place the monofilament thread on top of the machine, and embroidery thread in the bobbin. Sew along the diagonal line using a mock hand-quilting stitch. Refer to your machine’s instruction manual for tension adjustments if necessaiy.
5. Sew parallel rows at 2cm intervals using the machine quilting guide for accuracy. When the diagonal lines have been completed, mark a line at right angles and repeat with parallel rows of stitching as before to form a diamond pattern on the heart.
6. Place ihc embroidery thread through the top of ihe machine and attach the candlcwicking foot. Refer to your machine’s instructions on programming a single candlewicking stitch and place one stitch at each diamond junction to replace the traditional hand-stitched knot.
7. Attach the braiding foot to the machine and select the heirloom ladder stitch. Position the 4mm ribbon under the presser foot and stitch around the raw edge of the heart shape, forming a decorative border. Begin sewing the border design where the large roses will be positioned.
8. Trace the heart design from the pattern sheet onto paper and draw the placement for the roses and the leaves before marking the fabric. To gauge the size : circles and the leayes as lines. When the placement is •Mtisfactoiy, transfer the design to the cushion front with the : on-permanent marker.
TIPS:
- If your machine doesn’t have a specialised mock hand-quilting stitch, use a triple straight stitch.
- If your machine can’t sew a candlewicking stitch, hand-sew a knot at each diamond junction.
- All marking pens should be pre-tested on a scrap of fabric to ensure the marks will be easily removed.
TIPS
• Three strands of ribbon floss threaded through ’·· centre grooves of a seven groove cording foot will give interesting variation on the heirloom ladder stitch.
• if your machine can’t sew an heirloom ladder stitch, use a
• Tiole, utility blanket stitch.
8. Place a sample piece of fabric in the embroidery hoop to test the silk ribbon technique.
Machine Set-up:
Machine foot : Foot removed
Needle: 80
‘Top thread: Monofilament
Bobbin thread: Bobbinfil
Feed teeth : Lowered
– Stitch length: 0
– Stitch width: 0
Set the machine for needle stop down if possible.
10: Place the hoop with the sample fabric on the machine, sew a few stitches in the fabric without moving the hoop to secure the thread ends.
TIP:
To create a beautiful shadow effect in leaves and flowers, use variegated silk ribbons.
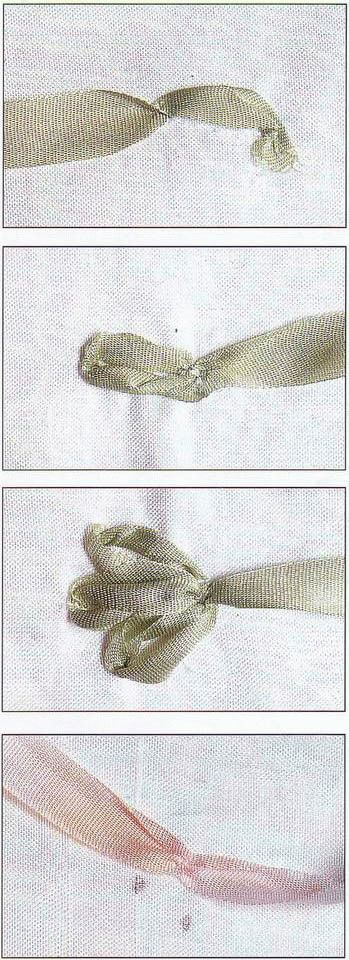
Leaves:
1.Begin to stitch the leaves by placing one end of ribbon under the needle and securing it in place with a few stitches.
2. Move the hoop away from the needle and walk the needle to the end of the leaf. Leave the needle in the fabric.Hold the ribbon across the front of the needle with a pair of overlocker tweezers or a short satay to anchor it in place.
3. Pivot the work and walk the needle back to the start of the leaf, leaving the needle and anchor it in place.
4. Repeat this method for two more leaves to form a cluster. To finish, cut the ribbon with embroidery scissors leaving a 6 mm tail. Tuck the tail under the leaf and anchor it.
Roses:
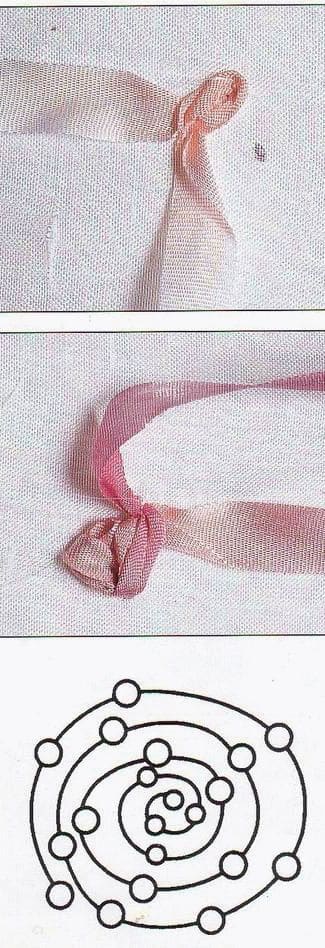
1. Each rose recuires 40 cm (16 in) of ribbon. Use 7 mm ribbon for large roses and 4 mm ribbon for the small roses. Cut the ribbon to length.
2. Markthree dots 6 mm apart in a triangle pattern. Fold the ribbon in half and stitch the center to one of the dots.
3. Walk the needle to the next dot, leave the needle in the fabric when you get there. Cross the ribbon in front of the needle. Stitch the ribbon in place.
4. Hold the ribbon ends away from the needle and walk to the next dot. Leave the needle in the fabric and cross over both ends of the ribbon in front of the needle. Stitch the ribbon in place. This forms the centre of the rose.
5. Continue to stitch the ribbon in an outwards radiating spiral pattern. Increase the petal lengths, anchoring ribbon twists at each point, until the rose reaches the desired diameter. See diagram 2.
6. Leave a 6mm (7<in) tail on each ribbon, then cut the ends. Tuck the ends under the last petal and anchor them in place.
7. Stitch all of the roses in the appropriate position, adjusting the sizes to suit the design.
FINISHING

Cut three strips across the width of the fabric for each frill. Cut strips 18cm (7in) wide for the outer frill and 12cm wide for the narrow frill. Join the seams to form a circle for each frill. Fold the strips lengthwise and baste the raw edges together. Attach the ruffler or the gathering foot and pleat or gather the frill. Baste both frills to the front of the embroidered fabric and complete the cover as you would a standard cushion.
See also embroidery tips
Don’t miss Christmas embroidery designs


