

Cross-stitch design for apron“Cook’s pinny”
If you’re looking for a gift to make a food lover smile, stitch up a treat with our tasty cherry apron.
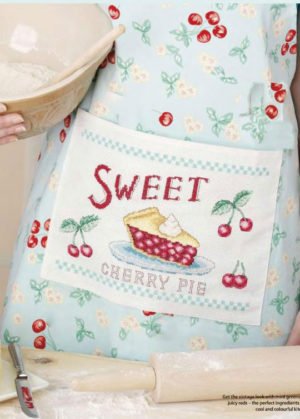
Cherry pie is one of the tastiest things to come out of the kitchen, and this particular slice certainly looks good enough to eat. Four different backstitch colours bring the cherries and lettering into sharp focus while the shading, in baby pinks and cherry reds, creates the all-important shine on those succulent fruits. We think you’ll agree that this project makes a delightful gift for a keen cook at Christmas, but do make sure you’ve eaten before you sit down to work on this fruit pie – otherwise the golden pastry, juicy cherries and wicked dollop of cream will soon have your tummy rumbling.
Type of stitches:
Cross stitch, fractionals, backstitch
Level: Intermediate
You will need
Threads: Stranded cotton as listed in the key Needle: Size 24 tapestry needle
Fabric: 14-count white aida measuring 23.5×31.5cm (9,5in x12,5in)
Extras: Ready-made apron, or cherry fabric from fabric stores on high street or online
Format: PDF, colored symbols
Get it!How to frame your work as a canvas
You’ll need just a few materials and a staple gun.
1 Back your stitching with interfacing and press. Measure your canvas frame and mark the halfway points along each edge. Join up these points in pencil to make a cross on your frame. Use a pin to push through the central stitch of your cross stitched image – the point where the two ’O’ gridlines cross on the chart. Push the pin through the centre of the cross on the frame. Place the stitching and frame face down and trim your fabric, leaving 5cm (2in) around the edge of the frame.
2 Staple the fabric to the centre of the top bar. Move to the centre of the bottom bar, pulling the fabric around the bar to keep it tight, and place the central staple. Repeat, placing a central staple in each of the two side bars. Return to the top bar and place staples on either side of the original, leaving about 2cm (3/4in) between each staple. Repeat for the bottom bar, and then the side bars, pulling the stitching taut at each stage.
3 To finish the edges neatly, grip the corner of your piece of stitching and pull it gently but firmly towards the opposite corner. This will create two flaps of fabric on either side. Fold each of these in towards the point that you are pulling and secure them in place with a single staple. Repeat with the other three corners, and trim any excess fabric. Staple a piece of ribbon to the middle of the top edge, to make a hanging loop.
See also free cross-stitch design Still life with tulips
You also might like Cross-stitch pattern for cushion Scarlet Blooms


